modbus v2
简介
modbus v2版本需要切换到branch_v2.0.0分支,该版本主要定义了以下三个概念:
设备:设备是真实物理设备在云端的映射。云端每个设备对应一个物理设备。
物模型:物模型提供对一类设备的统一定义,包括设备的属性,测点和接入协议等信息。通过使用设备模型作为模板可以创建同一类型的多个设备。
接入模板:设备接入模板是针对一种类型设备的接入方式的模板,相同接入方式的设备,可以复用同一个模板。其主要用于定义同一类设备的设备点表与物模型之间的映射关系。
下面会介绍如何使用Baetyl下发Modbus模拟器及对应驱动,同时通过baetyl-broker观测采集结果。
创建Modbus模拟器应用
首先,你需要POST调用/v1/nodes创建一个节点,在下面的使用示例中,我们创建了一个名为mmodbus0706的节点,注意修改请求中的selector字段,来将它修改为你自己的节点名称。
{
  "accelerator": "",
  "name": "modbus0706",
  "description": "",
  "cluster": false,
  "authType": "CERT",
  "labels": {},
  "sysApps": [],
  "nodeMode": "kube"
}
我们提供了Modbus tcp的模拟器镜像,通过POST调用/v1/apps来创建一个名为modbus-tcp-simulator的应用。
通过hostport将模拟器的5020端口映射出来。
{
    "name": "modbus-tcp-simulator",
    "mode": "kube",
    "type": "container",
    "labels": {},
    "selector": "baetyl-node-name=modbus0706",
    "services": [
        {
            "name": "baetyl-modbus-tcp-simulator",
            "image": "docker.io/baetyltech/modbus-simulator:v1.0.0",
            "ports": [
                {
                    "hostPort": 5020,
                    "containerPort": 5020,
                    "protocol": "TCP"
                }
            ],
            "args": [
                "modbus",
                "tcp"
            ],
            "replica": 1,
            "jobConfig": {
                "restartPolicy": "Never"
            }
        }
    ],
    "system": false,
    "cronStatus": 0,
    "cronTime": "2023-07-06T02:13:45Z",
    "replica": 1,
    "workload": "deployment",
    "jobConfig": {
        "completions": 0,
        "restartPolicy": "Never"
    },
    "ota": {},
    "autoScaleCfg": {}
}
修改Broker应用配置
baetyl-broker是Baetyl提供的端侧mqtt broker,所有使用Baetyl下发的应用程序,都会在容器内/var/lib/baetyl/system/certs目录下提供由baetyl-core签发的,可以直接使用mqtts连接baetyl-broker。
因此,如果你想使用mqtt box等其它应用使用mqtt用户名密码进行连接,需要对于broker进行一些配置操作。
首先使用GET访问/v1/nodes/{nodeName}接口,获取到broker应用的名称baetyl-broker-xxxxx。
然后通过GET访问/v1/apps/{brokerAppName}接口,获取到默认配置项的名称baetyl-broker-conf-xxxxx。
通过PUT访问/v1/config/baetyl-broker-conf-xxxxx来修改broker的配置,增加除了默认mqtts外的连接方式。
修改主要位于data->value->value中。
{
  "name": "baetyl-broker-conf-sf6we6zrw",
  "labels": {
    "baetyl-app-name": "baetyl-broker-nyufggv46",
    "baetyl-cloud-system": "true",
    "baetyl-node-name": "modbus0706"
  },
  "data": [
    {
      "key": "conf.yml",
      "value": {
        "type": "kv",
        "value": "listeners:\n  - address: 'tcp://0.0.0.0:8883'\nprincipals:\n  - username: test\n    password: test\n    permissions:\n      - action: pub\n        permit:\n          - '#'\n      - action: sub\n        permit:\n          - '#'\nsession:\n  sysTopics: [\"$link\", \"$baetyl\"]\nlogger:\n  level: debug\n  encoding: console\n  compress: true\n  maxAge: 10\n  maxSize: 10\n  maxBackups: 1"
      }
    }
  ]
}
上述配置中,我们新增了8883端口的mqtt服务,因此,需要修改baety-broker的端口配置,使用PUT调用/v1/apps/{brokerAppName}, 增加8883端口hostport映射到宿主机。
修改主要位于services->ports中新增的端口映射。
{
  "name": "baetyl-broker-nyufggv46",
  "mode": "kube",
  "type": "container",
  "labels": {
    "baetyl-cloud-system": "true"
  },
  "selector": "baetyl-node-name=modbus0706",
  "services": [
    {
      "name": "baetyl-broker",
      "baseName": "",
      "image": "baetyltech/broker:v2.1.1",
      "volumeMounts": [
        {
          "name": "broker-conf",
          "mountPath": "/etc/baetyl",
          "subPath": "",
          "readOnly": true,
          "autoClean": false
        }
      ],
      "ports": [
        {
          "containerPort": 50010,
          "protocol": "TCP"
        },
        {
          "serviceType": "ClusterIP",
          "protocol": "TCP",
          "containerPort": 8883,
          "hostPort": 8883
        }
      ],
      "env": [],
      "command": [],
      "args": [],
      "devices": [],
      "resources": {
        "limits": {},
        "requests": {}
      },
      "security": {
        "privileged": false
      },
      "replica": 1
    }
  ],
  "volumes": [
    {
      "name": "broker-conf",
      "config": {
        "name": "baetyl-broker-conf-sf6we6zrw"
      }
    }
  ],
  "system": true,
  "cronStatus": 0,
  "cronTime": "2023-07-06T02:04:51Z",
  "replica": 1,
  "workload": "deployment",
  "jobConfig": {
    "completions": 0,
    "restartPolicy": "Never"
  },
  "ota": {},
  "autoScaleCfg": {},
  "initServices": [],
  "volumeMounts": []
}
完成上述操作后,你就可以使用mqtt box等连接工具,通过以下连接信息,连接到baetyl-broker了。
address: mqtt://127.0.0.1:8883
username: test
password: test
创建配置项
现在,来创建配置项,通过POST方法调用/v1/configs接口,来创建配置项。
{
  "name": "modbus-driver-conf",
  "data": [
    {
      "key": "access_template.yml",
      "value": {
        "type": "kv",
        "value": "modbus-access-template:\n  properties:\n  - name: 开关\n    id: \"1\"\n    type: bool\n    visitor:\n      modbus:\n        function: 1\n        address: \"0x1\"\n        quantity: 1\n        type: bool\n        scale: 0\n        swapByte: false\n        swapRegister: false\n    current: null\n    expect: null\n  - name: 温度\n    id: \"2\"\n    type: float32\n    visitor:\n      modbus:\n        function: 3\n        address: \"0x0\"\n        quantity: 2\n        type: float32\n        scale: 0\n        swapByte: false\n        swapRegister: false\n    current: null\n    expect: null\n  - name: 湿度\n    id: \"3\"\n    type: float32\n    visitor:\n      modbus:\n        function: 3\n        address: \"0x2\"\n        quantity: 2\n        type: float32\n        scale: 0\n        swapByte: false\n        swapRegister: false\n    current: null\n    expect: null\n  - name: 高温阈值\n    id: \"4\"\n    type: int32\n    visitor:\n      modbus:\n        function: 3\n        address: \"0x4\"\n        quantity: 2\n        type: int32\n        scale: 0\n        swapByte: false\n        swapRegister: false\n    current: null\n    expect: null\n  - name: 高温报警\n    id: \"5\"\n    type: bool\n    visitor:\n      modbus:\n        function: 1\n        address: \"0x0\"\n        quantity: 1\n        type: bool\n        scale: 0\n        swapByte: false\n        swapRegister: false\n    current: null\n    expect: null\n  mappings:\n  - attribute: switch\n    type: value\n    expression: x1\n    precision: 0\n    deviation: 0\n    silentWin: 0\n  - attribute: temperature\n    type: value\n    expression: x2\n    precision: 0\n    deviation: 0\n    silentWin: 0\n  - attribute: humidity\n    type: value\n    expression: x3\n    precision: 0\n    deviation: 0\n    silentWin: 0\n  - attribute: high-temperature-threshold\n    type: value\n    expression: x4\n    precision: 0\n    deviation: 0\n    silentWin: 0\n  - attribute: high-temperature-alarm\n    type: value\n    expression: x5\n    precision: 0\n    deviation: 0\n    silentWin: 0\n"
      }
    },
    {
      "key": "models.yml",
      "value": {
        "type": "kv",
        "value": "modbus-simulator:\n- name: switch\n  type: bool\n  mode: rw\n- name: temperature\n  type: float32\n  mode: ro\n- name: humidity\n  type: float32\n  mode: ro\n- name: high-temperature-threshold\n  type: int32\n  mode: rw\n- name: high-temperature-alarm\n  type: bool\n  mode: ro\n"
      }
    },
    {
      "key": "sub_devices.yml",
      "value": {
        "type": "kv",
        "value": "devices:\n- name: modbus-0331\n  version: 1680263365qc3fdv\n  deviceModel: modbus-simulator\n  accessTemplate: modbus-access-template\n  deviceTopic:\n    delta:\n      qos: 0\n      topic: thing/modbus-simulator/modbus-0331/property/invoke\n    report:\n      qos: 0\n      topic: thing/modbus-simulator/modbus-0331/property/post\n    event:\n      qos: 0\n      topic: thing/modbus-simulator/modbus-0331/raw/c2d\n    get:\n      qos: 0\n      topic: $baetyl/device/modbus-0331/get\n    getResponse:\n      qos: 0\n      topic: $baetyl/device/modbus-0331/getResponse\n    eventReport:\n      qos: 0\n      topic: thing/modbus-simulator/modbus-0331/event/post\n    propertyGet:\n      qos: 0\n      topic: thing/modbus-simulator/modbus-0331/property/get\n    lifecycleReport:\n      qos: 1\n      topic: thing/modbus-simulator/modbus-0331/lifecycle/post\n  accessConfig:\n    modbus:\n      id: 1\n      interval: 5s\n      tcp:\n        address: 127.0.0.1\n        port: 5020\ndriver: \"\"\n"
      }
    }
  ]
}
上述配置项,主要由三个文件组成:
access_template.yaml: properties字段定义设备点表,mappings字段定义设备点表与物模型测点间的映射关系。
modbus-access-template:
  properties:
  - name: 开关
    id: "1"
    type: bool
    visitor:
      modbus:
        function: 1
        address: "0x1"
        quantity: 1
        type: bool
        scale: 0
        swapByte: false
        swapRegister: false
    current: null
    expect: null
  - name: 温度
    id: "2"
    type: float32
    visitor:
      modbus:
        function: 3
        address: "0x0"
        quantity: 2
        type: float32
        scale: 0
        swapByte: false
        swapRegister: false
    current: null
    expect: null
  - name: 湿度
    id: "3"
    type: float32
    visitor:
      modbus:
        function: 3
        address: "0x2"
        quantity: 2
        type: float32
        scale: 0
        swapByte: false
        swapRegister: false
    current: null
    expect: null
  - name: 高温阈值
    id: "4"
    type: int32
    visitor:
      modbus:
        function: 3
        address: "0x4"
        quantity: 2
        type: int32
        scale: 0
        swapByte: false
        swapRegister: false
    current: null
    expect: null
  - name: 高温报警
    id: "5"
    type: bool
    visitor:
      modbus:
        function: 1
        address: "0x0"
        quantity: 1
        type: bool
        scale: 0
        swapByte: false
        swapRegister: false
    current: null
    expect: null
  mappings:
  - attribute: switch
    type: value
    expression: x1
    precision: 0
    deviation: 0
    silentWin: 0
  - attribute: temperature
    type: value
    expression: x2
    precision: 0
    deviation: 0
    silentWin: 0
  - attribute: humidity
    type: value
    expression: x3
    precision: 0
    deviation: 0
    silentWin: 0
  - attribute: high-temperature-threshold
    type: value
    expression: x4
    precision: 0
    deviation: 0
    silentWin: 0
  - attribute: high-temperature-alarm
    type: value
    expression: x5
    precision: 0
    deviation: 0
    silentWin: 0
models.yaml: 定义物模型的测点,包含名称,数据类型以及只读或读写。
modbus-access-template:
  properties:
  - name: 开关
    id: "1"
    type: bool
    visitor:
      modbus:
        function: 1
        address: "0x1"
        quantity: 1
        type: bool
        scale: 0
        swapByte: false
        swapRegister: false
    current: null
    expect: null
  - name: 温度
    id: "2"
    type: float32
    visitor:
      modbus:
        function: 3
        address: "0x0"
        quantity: 2
        type: float32
        scale: 0
        swapByte: false
        swapRegister: false
    current: null
    expect: null
  - name: 湿度
    id: "3"
    type: float32
    visitor:
      modbus:
        function: 3
        address: "0x2"
        quantity: 2
        type: float32
        scale: 0
        swapByte: false
        swapRegister: false
    current: null
    expect: null
  - name: 高温阈值
    id: "4"
    type: int32
    visitor:
      modbus:
        function: 3
        address: "0x4"
        quantity: 2
        type: int32
        scale: 0
        swapByte: false
        swapRegister: false
    current: null
    expect: null
  - name: 高温报警
    id: "5"
    type: bool
    visitor:
      modbus:
        function: 1
        address: "0x0"
        quantity: 1
        type: bool
        scale: 0
        swapByte: false
        swapRegister: false
    current: null
    expect: null
  mappings:
  - attribute: switch
    type: value
    expression: x1
    precision: 0
    deviation: 0
    silentWin: 0
  - attribute: temperature
    type: value
    expression: x2
    precision: 0
    deviation: 0
    silentWin: 0
  - attribute: humidity
    type: value
    expression: x3
    precision: 0
    deviation: 0
    silentWin: 0
  - attribute: high-temperature-threshold
    type: value
    expression: x4
    precision: 0
    deviation: 0
    silentWin: 0
  - attribute: high-temperature-alarm
    type: value
    expression: x5
    precision: 0
    deviation: 0
    silentWin: 0
sub_devices.yaml: 定义了设备的连接信息,采样频率,端侧进行数据上报的topic。
devices:
- name: modbus-0331
  version: 1680263365qc3fdv
  deviceModel: modbus-simulator
  accessTemplate: modbus-access-template
  deviceTopic:
    delta:
      qos: 0
      topic: thing/modbus-simulator/modbus-0331/property/invoke
    report:
      qos: 0
      topic: thing/modbus-simulator/modbus-0331/property/post
    event:
      qos: 0
      topic: thing/modbus-simulator/modbus-0331/raw/c2d
    get:
      qos: 0
      topic: $baetyl/device/modbus-0331/get
    getResponse:
      qos: 0
      topic: $baetyl/device/modbus-0331/getResponse
    eventReport:
      qos: 0
      topic: thing/modbus-simulator/modbus-0331/event/post
    propertyGet:
      qos: 0
      topic: thing/modbus-simulator/modbus-0331/property/get
    lifecycleReport:
      qos: 1
      topic: thing/modbus-simulator/modbus-0331/lifecycle/post
  accessConfig:
    modbus:
      id: 1
      interval: 1m0s
      tcp:
        address: 172.18.4.177
        port: 5020
driver: ""
在上述配置中,需要根据实际情况,修改你的接入模板,物模型以及子设备中的连接地址。 由于所有的程序都运行在容器中,所以子设备中的127.0.0.1地址,应当修改成实际的IP。
创建Modbus应用
最后,使用POST调用/v1/apps创建Modbus应用,需要挂载系统/dev目录,
以及将刚刚创建的配置项挂载到/etc/baetyl目录,至此,所有云端配置创建完毕。
{
  "name": "modbus-tcp",
  "mode": "kube",
  "type": "container",
  "selector": "baetyl-node-name=modbus0706",
  "services": [
    {
      "name": "modbus-baetyl-driver",
      "image": "docker.io/baetyltech/modbus:v2.2.5",
      "volumeMounts": [
        {
          "name": "device-path",
          "mountPath": "/dev"
        },
        {
          "name": "driver-conf",
          "mountPath": "/etc/baetyl"
        }
      ],
      "resources": {},
      "security": {
        "privileged": true
      },
      "replica": 1,
      "jobConfig": {
        "restartPolicy": "Never"
      }
    }
  ],
  "volumes": [
    {
      "name": "device-path",
      "hostPath": {
        "path": "/dev"
      }
    },
    {
      "name": "driver-conf",
      "config": {
        "name": "modbus-driver-conf"
      }
    }
  ],
  "cronStatus": 0,
  "cronTime": "2023-04-25T03:21:07Z",
  "dnsPolicy": "ClusterFirst",
  "replica": 1,
  "workload": "deployment",
  "jobConfig": {
    "completions": 0,
    "restartPolicy": "Never"
  },
  "ota": {},
  "autoScaleCfg": {}
}
验证
在端侧执行节点安装后,会发现有以下应用在运行中。

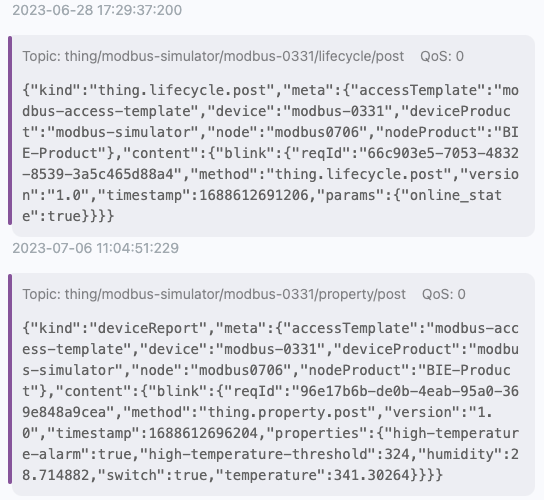
从mqttx中,我们也能收到由驱动上报的节点在线以及从模拟器中采集到的数据。
附
更多概念以及可视化操作页面,请参考:BIE